-->

archel67|Free Software

software full crack, Software Full Version, apk mod, apk premium, software repack, ccleaner full version, internet download manager full version, idm repack, snaptube mod, picsart mod, picsart premium, kinemaster mod, kms tool, kms office, spotify mod, spotify premium, coreldraw full, microsoft toolkit, filmora full version, download apk mod, filmora terbaru, idm terbaru full, download coreldraw terbaru full, download aktifasi office, download aktifasi windows, windows aktifasi, office aktifasi

  • Home
  • About
  • Kontak
  • Sitemap
  • Menu ▼
    • Aktivasi Office
    • Aktivasi WIndows
    • APK
    • Download Utility
    • Utility
    • Antivirus
    • GAME

16 Oct 2012

Home » Trik n Tips » Diffusion Efek Lighting Studio

Diffusion Efek Lighting Studio

  archel67     16 Oct 2012
Pernah bermimpi menjadi model? klo memang belum dan ingin merasakan hasil fotonya maka tutorial ini layak anda coba, baiklah kali ini saya akan membagikan bagaimana cara agar foto yang kita punya lebih kelihatan glamour layaknya foto di Studio dengan Lighting yang bagus dan oke punya. Namanya Efek Diffusion Lighting Studio.

Berikut ini langkah - langkahnya:
1. Buka Adobe Photoshop anda, disini saya menggunakan Photoshop CS3
Masukkan foto yang akan diedit ke Aplikasi Photoshop anda (tekan CTRL + O) 
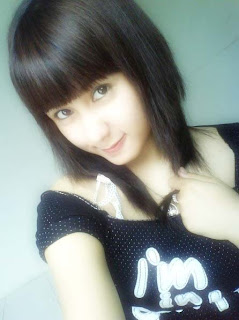
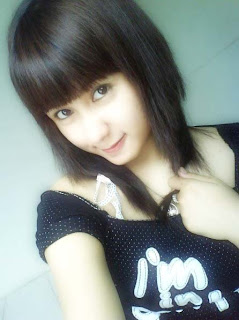
disini saya menggunakan foto, disini saya menggunakan foto yang saya dapat dari Facebook 


2. Tekan CTRL+J untuk menggadakan Layer

 3. Ubah mode Layer menjadi==Screen


 4. Tambahkan Layer >> Layer Mask >> Reveal All


5. Tambahkan Image >> Apply Image


6. Klik kiri untuk mengaktifkan Layer thumbnail yang berwarna (original) di layer window


Tambahkan Filter >> Blur >> Glaussian Blur 
masukkan Radius 10.0 Pixels


ok, selesai hasilnya...
Sebelum                                   


Sesudah


Ok sebenarnya ini saja cukup, namun bagi yang mau lebih natural mari lanjutkan...

7. Tekan CTRL + G untuk mengroup Layer 


Tekan 
Layer >> Layer Mask >> Reveal All
Kemudian Image >> Apply Image >> OK
Tambahkan Edges filter (Filter >> Stylize >> Find Edges).


Tambahkan Filter >> Blur >> Glaussian Blur
Radius 3.0 
Hasilnya:

Sebelum ditambah filter Find Edge                        Sesudah ditambah filter Find Edge 
Lebih tinggi Exposurenya


Foto Efek Diffusion Nampak Lebih Natural
Semoga bermanfaat untuk sobat Blogger
By archel67 di October 16, 2012
Label: Trik n Tips

21 comments:

  1. Hermanbagus16 October, 2012

    keren aku save sob..

    ReplyDelete
    Replies
    1. archel6722 October, 2012

      silahkan sob,
      maaf bru bs bls komenx...
      cz hbs sakit.... :(

      Delete
      Replies
        Reply
    2. Reply
  2. Nakusan16 October, 2012

    saya mau cb sob. biar foto saya bagus, tp bkn Herman Bagus yg komen itu....:D

    ReplyDelete
    Replies
    1. archel6722 October, 2012

      ok silahkan....
      maaf bru bs bls komenx...
      cz hbs sakit.... :(

      Delete
      Replies
        Reply
    2. Nakusan Computer25 October, 2012

      hbs sakit ya kawan...
      kita hrs ingat selalu jaga kesehatan kawan.

      Delete
      Replies
        Reply
    3. archel6727 October, 2012

      ya sob....

      makasih sob

      Delete
      Replies
        Reply
    4. Reply
  3. Senja Berita16 October, 2012

    terima kasih..
    oya follback selesai dilaksanakan,

    atas nama gadis.

    ReplyDelete
    Replies
    1. archel6722 October, 2012

      ok...
      terima kasih atas kerjasamanya...

      Delete
      Replies
        Reply
    2. Reply
  4. Ulan News16 October, 2012

    Kata Galau Bijak Cinta Sejati Wach mantap neh, aku bookmarks dulu sob xD . Oo ia.. kawan follback done neh.

    ReplyDelete
    Replies
    1. archel6722 October, 2012

      silahkan....
      ok makasih sob..
      maaf bru bs bls komenx...
      cz hbs sakit.... :(

      Delete
      Replies
        Reply
    2. Reply
  5. Vpie ◥TwekzLibz◤ MahaDhifa16 October, 2012

    . . keren nich, simpan achhhh,, . .

    ReplyDelete
    Replies
    1. archel6722 October, 2012

      silahkan mbak...
      maaf bru bs bls komenx...
      cz hbs sakit.... :(

      Delete
      Replies
        Reply
    2. Vpie ◥TwekzLibz◤ MahaDhifa26 October, 2012

      . . sakit apakah situ?!? . .

      Delete
      Replies
        Reply
    3. archel6727 October, 2012

      sakit tipes mbak....

      Delete
      Replies
        Reply
    4. Vpie ◥TwekzLibz◤ MahaDhifa09 November, 2012

      .. walachhhhh,, km kecapekan ya?!? makanya jangan lupa untuk izty kawan. tapi kalo saat ini udah sembuh belum?!? ..

      Delete
      Replies
        Reply
    5. archel6709 November, 2012

      alhamdulillah.....

      udh mbk sembuh......

      ya mbk, makc ya mbk

      :)

      Delete
      Replies
        Reply
    6. Reply
  6. archel6722 October, 2012

    silahkan sob...
    maaf bru bs bls komenx...
    cz hbs sakit.... :(

    ReplyDelete
    Replies
      Reply
  7. Obat Penyakit Diabetes Melitus09 January, 2013

    Berkunjung kak..maksih atas infonya kak

    ReplyDelete
    Replies
    1. archel6710 January, 2013

      sama2....sob :D

      Delete
      Replies
        Reply
    2. Reply
  8. Sigli Cyber25 March, 2013

    mkasi sob buat tutorialnya..

    oya..
    aq udah follow nih blog sobat..
    sya tunggu follbacknya ya sob

    ReplyDelete
    Replies
    1. archel6728 March, 2013

      sama2 sob....

      ok...

      Delete
      Replies
        Reply
    2. Reply
Add comment
Load more...

Silahkan anda berkomentar dengan baik.
Dilarang SPAM, JUNK, SARA.....!!

Labels

Activasi Office Activasi Windows Anti Virus apk Aplikasi Warnet Billing Browser Download Utility Internet Lain-lain Mutimedia OS Photo Manager Portable Software Trik n Tips Utility Windows

About

Kumpulan Software dan App untuk Komputer ataupun Android

Follow by Email

Subsribe to get post update from this blog in your email inbox.

Copyright © archel67|Free Software. All rights reserved. Template by Romeltea Media